Saturday, June 18, 2011

Hamburger Joint Remodel: After


SO MUCH BETTER!

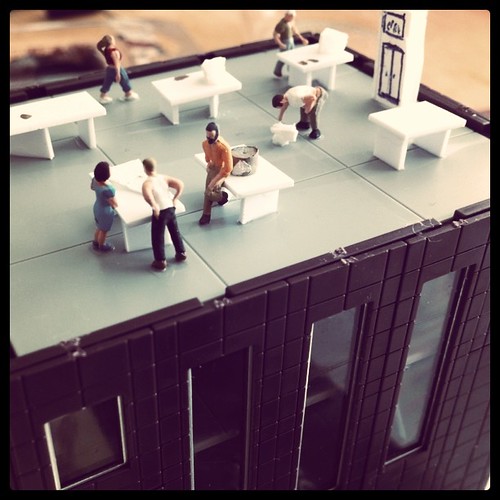
This was a lot of fun. I added a floor made from styrene and tried to make it look like the kind of floor a joint like this would have. No slip for all the frying going on. :)

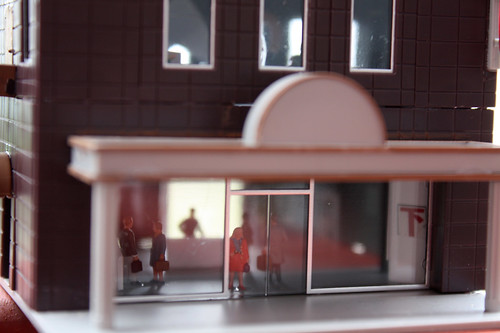
A repaint of the counter did wonders as did a paint up of the whole interior and the stone on the exterior walls. (Having light blue painted stone was horrid)

I tore out their silly looking trees and put in some nice moss bushes. All the people were replaced with Woodland Scenic folks.

I added some little signs and a menu area on the counter. A fridge, stove, oven and back counter top space topped things off perfectly.

I did a repaint of the parking lot as well, making it a bit flatter black/gray.

This was a fun little one night project. I'm happy with the way it turned out.

More photos here: http://www.flickr.com/photos/malcojojo/sets/72157626986976774/

~~

Hamburger Joint Remodel: Before


I purchased this at a local hobby shop on a lark. It had a neat look and was ready to drop into my setup right out of the box. I placed it on my work layout and it worked well...except for the lack of detail. And the cheesy nature of the thing as a whole. The cars are empty shells. The building itself was empty except for a counter. The three figures were little blobs of plastic - silly looking.

I stare at this model while on the phone or between tasks and would snarl at it. It was the perfect model of cheap. It had to be altered.

I took some pictures and had at it, chopping it up as quickly as I could. The cars are crap and not worth keeping. Same with the people. I saved the counter, the parking lot area and the main building. I needed to add a place to cook, to store food and a little prep area.

See Hamburger Joint Remodel: After for more.

More photos here: http://www.flickr.com/photos/malcojojo/sets/72157626986976774/

~~

Monday, June 13, 2011

Beautiful KATO building modification!


This inspiring work really hits the mark! This relatively simple modification to the KATO "Broadcast Building" (item 23-436) opens it up and makes it look more like a building would look in real life. While the KATO business buildings are fantastic, they all have something just a LITTLE off about them. In this case, it was the fact that the building just had one row of large windows in the front with some tiny windows on the side. It has other great details like a row of stairs in the back side and a cool lobby entrance area, so the miss on the windows seemed a little sad. Such an easy thing to address...and QUINNTOPIA did just that!

The modification is the row of windows on the left side of the building - previously a stark and blank wall. The addition of lights, built out floors and details really sends this mod to the top of the "OH MY GAWD! SO COOL!" list.


I own this building and liked it...until I saw this modification. Now it's just ok. :) It's amazing to see what a little time and effort can do. I'm excited about trying some of this kind of modification in the future.

Full article is located here - you'll want to bookmark Quinntopia for sure:
http://quinntopia.blogspot.com/2011/05/kato-broadcast-building-modifications.html

~~

Amazing work


This has become the latest drool spot to be added to my list of amazing train blogs. The detail and the craftsmanship.....whew!

http://trainscape.blogspot.com

Some amazing work for sure. Bookmark it!

Friday, June 10, 2011

Starcup Coffee Building

More pictures here:
http://www.flickr.com/photos/malcojojo/sets/72157626932204350/


The Tomix Small Size Office Building B is a cute set, but it had these massive front windows and no floors. In my buying mania, I purchased it, ripped it out of the box and tossed it among the other buildings I had, but it always bugged me that it was....well...hollow. A big, empty shell of a building.

I finally made this right with the use of styrene and WHAT a difference.

I crafted floors from styrene and made tables and chairs to fill things out. Wall details and the like were added as well to really drive things home. But, I was faced with the problem of getting the floors to stay inside the building.

My first plan was to stick the floors to the inside of the structure itself. I knew that that was going to fail, but could not think of another option. Finally, as I tried to fall asleep one eve, it came to me. Build an internal structure that could slide into the main building. I was thrilled with the ease of this plan. Worked like a charm.

As I look back on this project, I could have taken more time with the detailing and craftsmanship. Of course, that's the case for all of these projects! :) I did manage to spend a few days on this (instead of hours) and I think it shows. A little more time and effort will round out the next project nicely.

Comments welcome.

Monday, June 6, 2011

San Francisco Trolleys


Some photos from my San Francisco photo walk include a lot of shots of trolleys on Market Street. Take a look if you're a trolley fan! http://www.flickr.com/photos/malcojojo/sets/72157626774004109/

The Thompson Building


More photos here:
http://www.flickr.com/photos/malcojojo/sets/72157626898677980/


This was the first time I've used the Greenmax 2101 Building Set. The sets come in a base model with additional "floors" you can buy as an add on.

I got the base and two floor additions and was eager to break in and get something going. The big thing on this project was to actually take time to build out each floor with people and furniture instead of the usual hollow, empty building.

The process was a bit of a chore are first - mostly in the building itself. It's a VERY modular set and it really allows for some creativity. Unfortunately, it also made for some initial confusion as well. The instructions cover multiple aspects of building, but the many options available made them a bit confusing at first. However, once the concept hit, it was simple to get things together.

I'm happy with the way this turned out for the most part, but there were some things that I would have liked to be a little cleaner. The panels were my major pain point. The building is made of of panels which you can arrange to your liking, which is grand. However, some fit together better than others. The ones that don't mix well tended to pop out a bit creating a somewhat obvious bulge. I'm sure if I took more time on it, I could have cut them down to fit better. Live and learn.

The insides were a lot of fun to build out. Now I just need to learn about wiring and LED lights to light these buildings up!